


Обзор
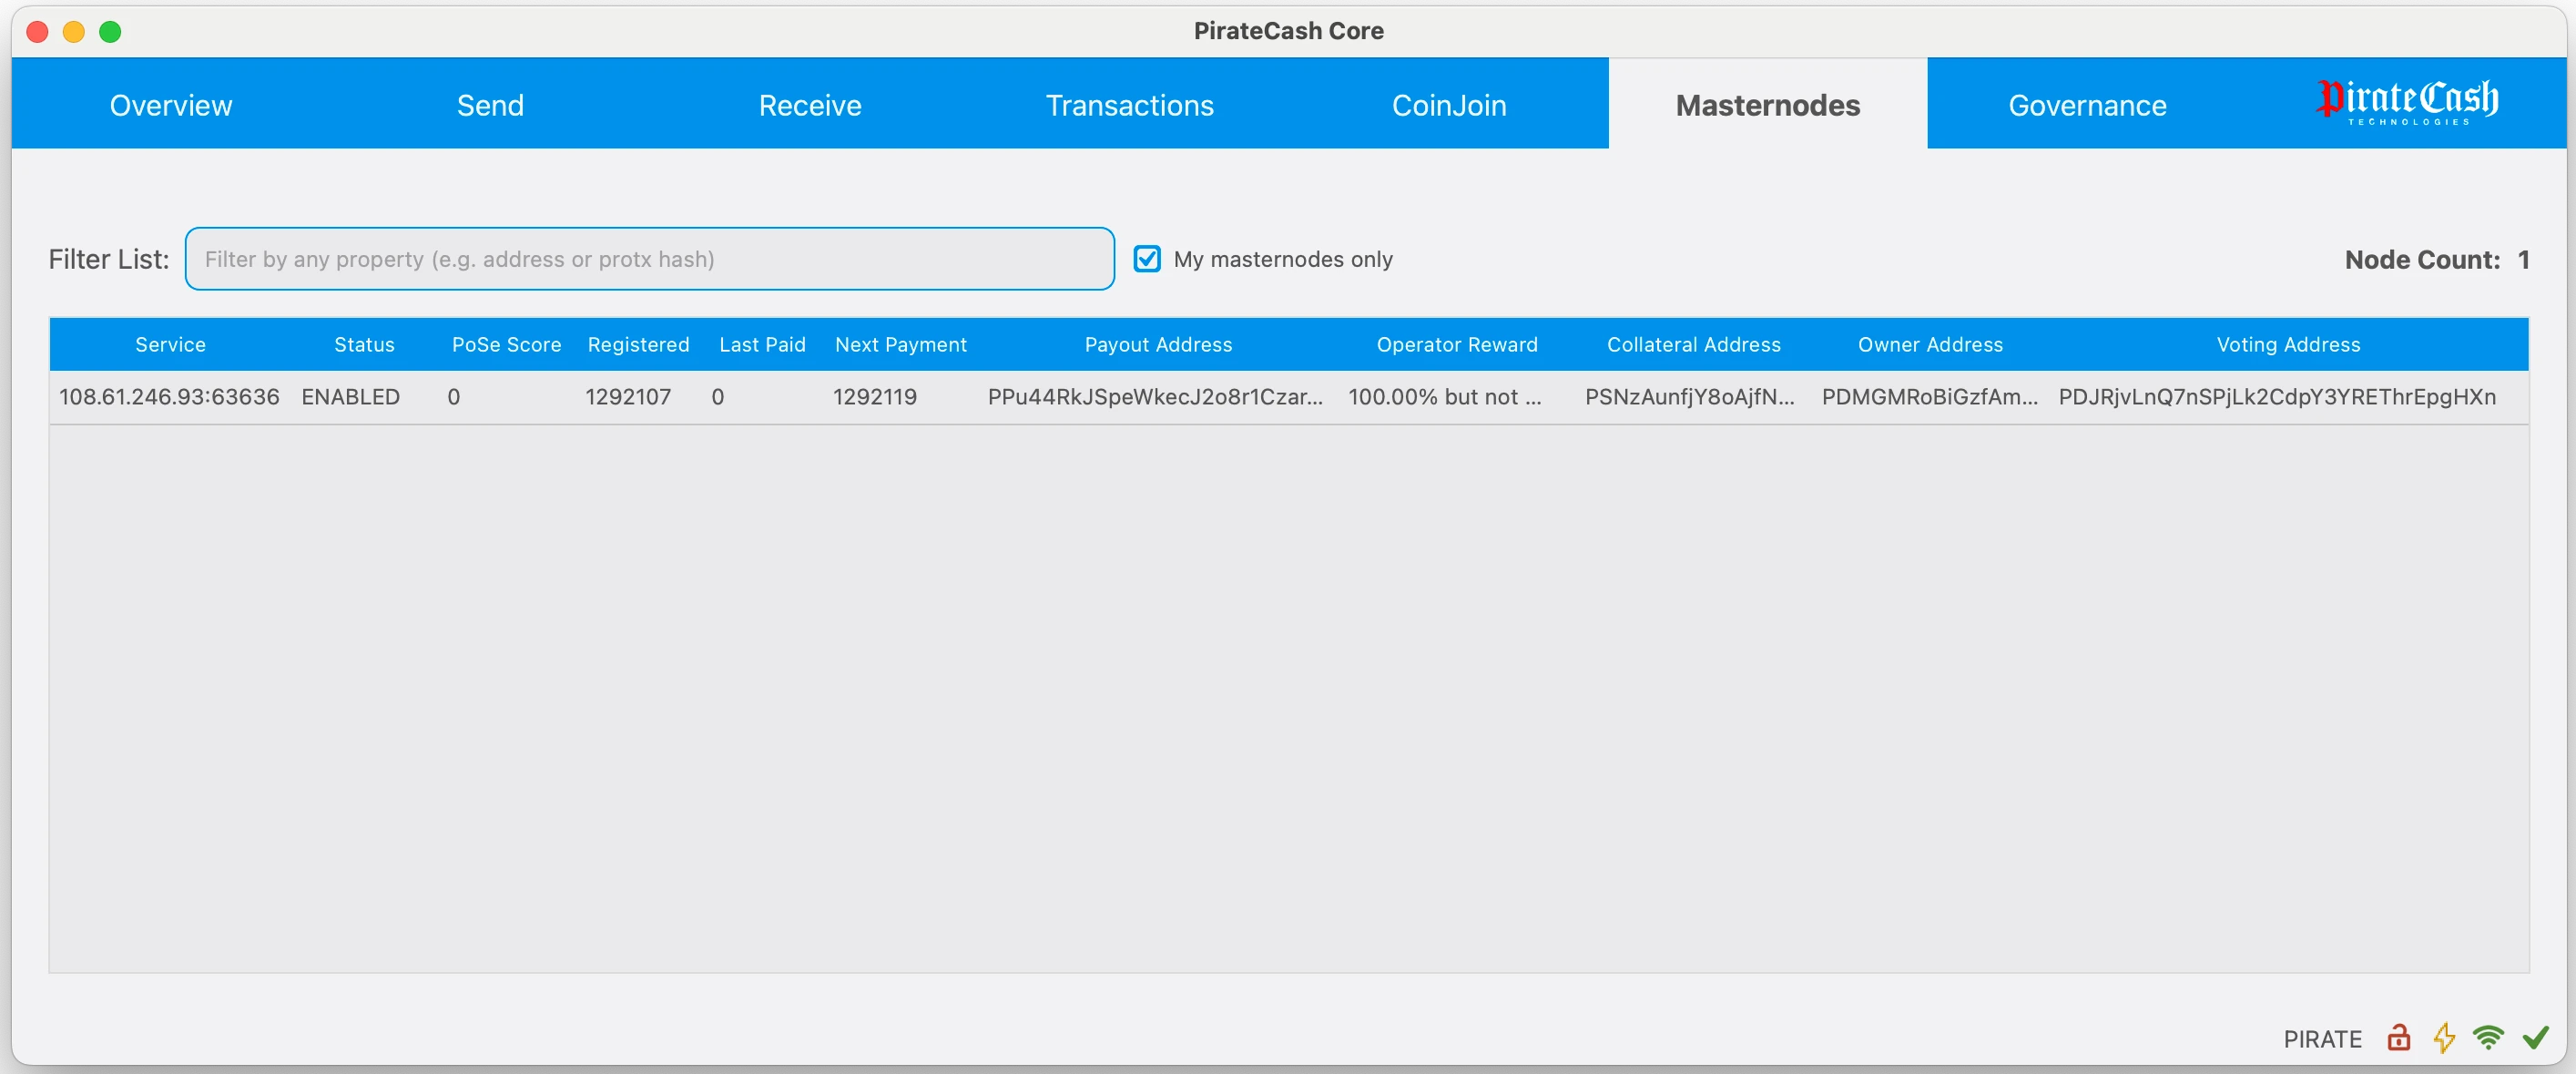
- Статистика мастернод
- Загрузка кошелька с GitHub, и подготовка
- Покупка Pirate на биржах , отправка залога мастерноды на адрес кошелька
- Настройка сервера Linux
- Управление сервером с помощью PuTTY(Windows) или Terminal(Mac)
- Настройка файла конфигурации мастерноды
Загрузка кошелька с GitHub, и подготовка
- Распакуйте архив в любое место, запустите исполняющий файл.
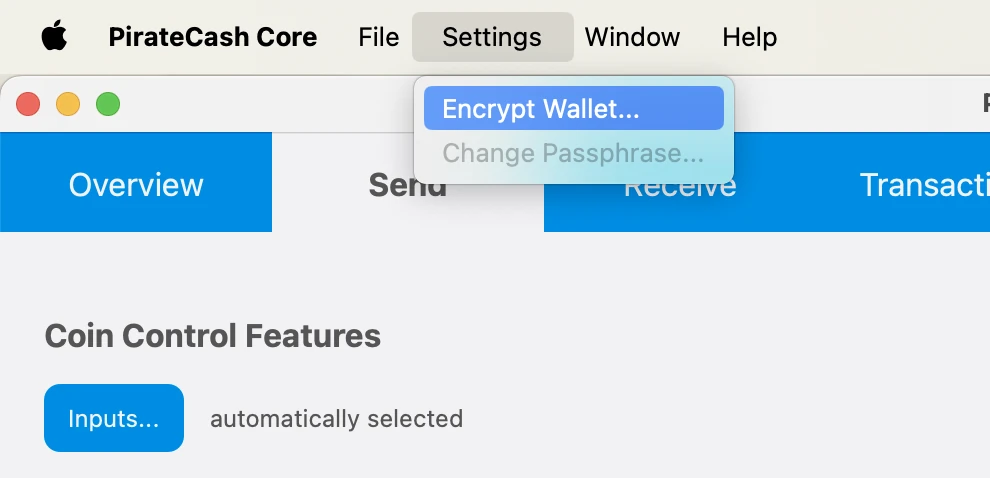
- Установите пароль на свой кошелек, Настройки -> Зашифровать бумажник, впишите пароль 2 раза, обязательно сохраните пароль в надёжном месте, перезапустите кошелек
- Резервная копия: Файл -> Сделать резервную копию бумажника, сохраните созданный файл на флешку или на отдельном диске, это полная копия вашего кошелька.
Покупка Pirate
Купите на любой из бирж немного больше 10000 Pirate.
Для залога мастерноды нужна транзакция РОВНО 10000 Pirate.
Примечание: вам нужно приобрести немного больше 10000 Pirate, потому-что:
- Биржа возьмёт комиссию за вывод.
- Когда вы отправите 10000 Pirate на адрес кошелька, будет небольшая комиссия сети.
- Создайте новый адрес : Получение -> Новый адрес, отправьте купленные монеты Pirate на этот адрес
- Создайте ещё один адрес, присвойте ему имя MN1, используйте в имени адреса только цифры и латинские буквы !!!
- Скопируйте этот адрес, перейдите на вкладку Отправка и вставьте скопированный адрес в поле Получатель, в поле Метка у вас должно отображаться имя адреса MN1.
- Укажите сумму в поле Количество РОВНО 10000 и нажмите Отправить.
Создание сервера Линукс на Digital Ocean
- Зарегистрируйте аккаунт, создайте новый дроплет на Digital Ocean. Примечание : Digital Ocean выбран как пример, вы можете использовать любой VPS-сервер на ваше усмотрение
- Выберите Ubuntu 26.04 (LTS)
- Минимальные требования 2GB Ram
- Выберите любой понравившийся регион
- Запишите IP адрес вашего сервера
- Проверьте свой email для доступа к серверу
Доступ к вашему серверу
Доступ к серверу через PuTTY - это позволит вам копировать и вставлять команды, через web-консоль вы не сможете этого сделать, пользователи MAC могут использовать Terminal. Панель запуска -> Поиск -> Терминал -> Введите: ssh root@IP
- Загрузите и установите PuTTY, запустите программу.
- Введите в поле Host ip адрес вашего сервера, в поле Saved Sessions введите имя вашего соединения и нажмите Save, это позволит в будущем не вводить ip сервера постоянно. Выберите своё соединение из списка и нажмите Open.
- Залогиньтесь под root, пароль от сервера придёт к вам на email, чтобы вставить скопированный пароль, достаточно кликнуть правой кнопкой мыши в терминале PuTTY. Примечание: вставленный пароль не будет виден, просто нажмите Enter.
- При первом входе в систему, вам будет предложено сменить пароль, сделайте это и запишите его.
Создайте файл подкачки:
fallocate -l 1G /swapfile
chmod 600 /swapfile
mkswap /swapfile
swapon /swapfile
echo "/swapfile none swap sw 0 0" >> /etc/fstab
Конфигурация файла мастерноды
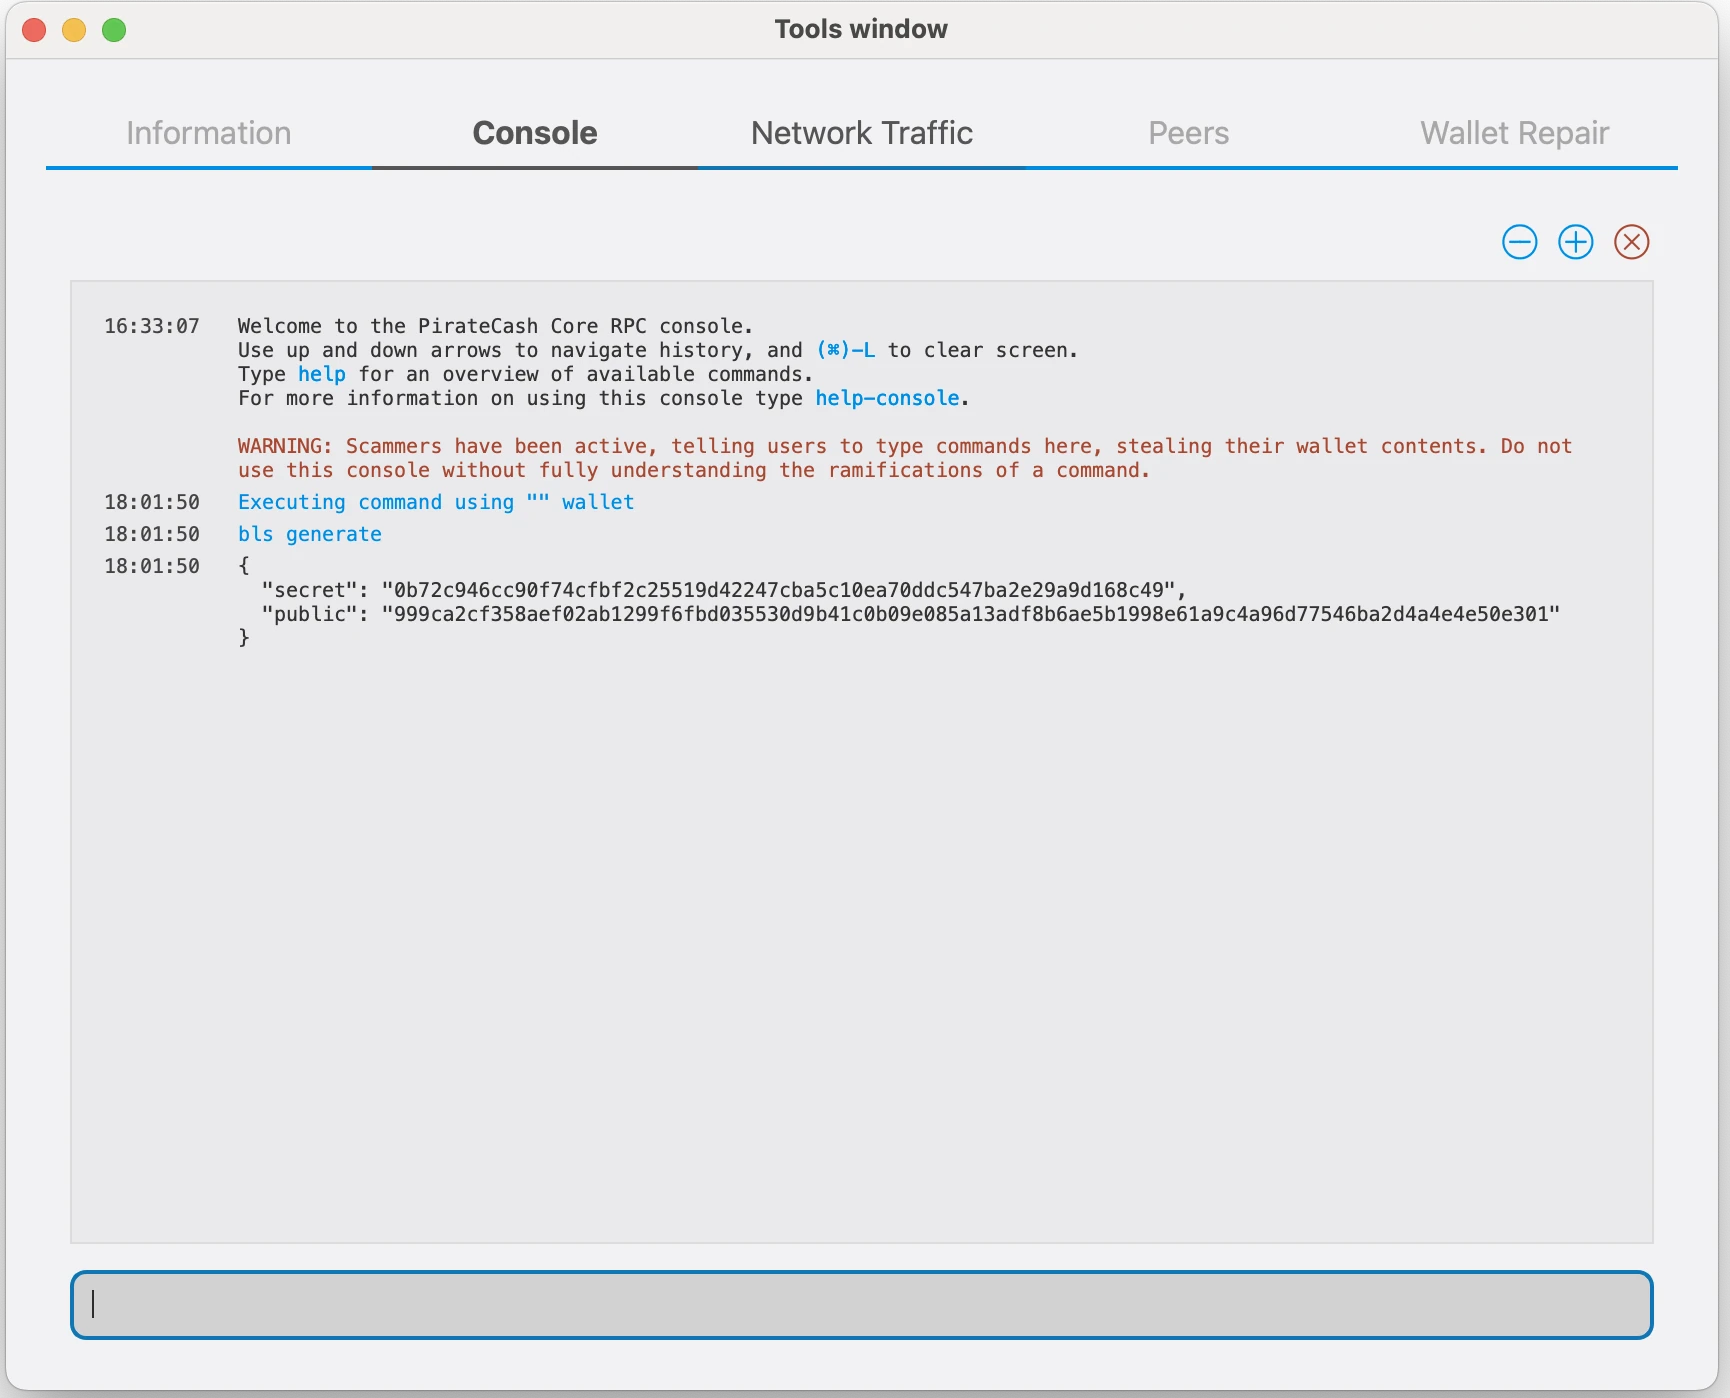
- Запустите консоль кошелька: Window -> Console
- Введите: bls generate и нажмите Enter
- После генерации BLS-ключа самый простой способ настроить ноду: использовать скрипт из нашего репозитория masternode.
Автоматическая настройка из репозитория masternode
- Купите 10 001 PIRATE, например на PancakeSwap.
- Если у вас уже есть токены, обменяйте их на нативные PIRATE через @piratecash_bot.
- Запустите сервер у хостинг-провайдера, например через эту ссылку на хостинг.
- Подключитесь к серверу по SSH.
- Склонируйте репозиторий: https://github.com/piratecash/masternode.
- Сгенерируйте BLS-ключ в PirateCash командой bls generate. Вставьте значение secret в masternodeblsprivkey=xxx в файле /home/pirate/.piratecore/piratecash.conf внутри Docker или /opt/node/piratecash/piratecash.conf на хост-системе.
- Запустите ./install_masternode.sh для автоматической настройки.
- Перезапустите Docker.
- Активируйте мастерноду через PirateCash Core, затем продолжите шаги активации ниже.
Обновление уже установленной автоматической мастерноды
Этот раздел для тех, кто ранее устанавливал ноду из репозитория masternode. Файл piratecash-main/piratecash.conf в репозитории — только шаблон; рабочий конфиг ноды находится в /opt/node/piratecash/piratecash.conf.
- Подключитесь к серверу по SSH и перейдите в директорию репозитория, обычно это ~/masternode.
- Выполните git pull. Если Git пишет, что локальные изменения в piratecash-main/piratecash.conf будут перезаписаны, проверьте, не храните ли вы важные значения только в этом шаблонном файле.
- Если значения уже есть в /opt/node/piratecash/piratecash.conf, сбросьте локальное изменение шаблона командой git checkout -- piratecash-main/piratecash.conf.
- Снова выполните git pull, чтобы скачать новые файлы, включая update_masternode.sh.
- Запустите ./update_masternode.sh. Скрипт обновит Docker-настройку, сохранит или создаст Corsa RPC-данные, запишет их в .env и /opt/node/piratecash/piratecash.conf, затем пересоберёт и запустит контейнеры.
cd ~/masternode
git status
git checkout -- piratecash-main/piratecash.conf
git pull
./update_masternode.sh
После завершения скрипта проверьте, что контейнеры запущены:
docker compose ps
Если вы специально меняли только шаблонный файл в репозитории, скопируйте нужные значения перед git checkout -- и после обновления перенесите их в /opt/node/piratecash/piratecash.conf.
- Второй вариант: ручная настройка. Этот способ сложнее; используйте его только если не хотите использовать скрипт автоматической настройки.
-
На сервер Загрузите архив кошелька и разархивируйте его, для этого в окне PuTTY выполните:
wget https://github.com/piratecash/piratecash/releases/download/v23.1.7-pirate/piratecashcore-23.1.7-x86_64-pc-linux-gnu.tar.bz2
bzip2 -dc piratecashcore-23.1.7 -x86_64-pc-linux-gnu.tar.bz2 | tar -x
- Создайте директорию mkdir ~/.piratecore
-
Создайте файл ~/.piratecore/piratecash.conf со следующим содержимым:
rpcuser=XXXXXXXXXXXXX
rpcpassword=XXXXXXXXXXXXXXXXXXXXXXXXXXXX
corsarpcuser=XXXXXXXXXXXXX
corsarpcpassword=XXXXXXXXXXXXXXXXXXXXXXXXXXXX
corsarpcport=46464
rpcallowip=127.0.0.1
server=1
rest=1
listen=1
txindex=1
listenonion=0
daemon=1
maxconnections=700
masternodeblsprivkey=ХХХХХХХХХХХХХХХХХХХ
externalip=XXX.XXX.XXX.XXX
Замените поля, отмеченные XXXXXXX, следующим образом:
rpcuser: укажите любую строку из цифр или букв, специальные символы не допускаются
rpcpassword: укажите любую строку из цифр или букв, специальные символы не допускаются
corsarpcuser: укажите имя RPC-пользователя локального сервиса corsa-chat
corsarpcpassword: укажите RPC-пароль локального сервиса corsa-chat
corsarpcport: укажите RPC-порт, настроенный для corsa-chat; по умолчанию 46464
externalip: IP-адрес вашего VPS
Заполните поле masternodeblsprivkey, выполнив команду bls generate в консоли, затем перезапустите демон piratecashd.
-
Перед запуском PirateCash Core скачайте и запустите демон Corsa. Используйте те же значения RPC-логина и пароля, что указаны в corsarpcuser и corsarpcpassword в piratecash.conf:
wget https://github.com/piratecash/corsa/releases/download/v1.0.62/corsa-linux-amd64.tar.bz2
bzip2 -dc corsa-linux-amd64.tar.bz2 | tar -x
nohup env \
CORSA_LISTEN_ADDRESS=:64646 \
CORSA_BOOTSTRAP_PEERS=65.108.204.190:64646 \
CORSA_RPC_HOST=127.0.0.1 \
CORSA_RPC_PORT=46464 \
CORSA_RPC_USERNAME=XXXXXXXXXXXXX \
CORSA_RPC_PASSWORD=XXXXXXXXXXXXXXXXXXXXXXXXXXXX \
./corsa-node > corsa-node.log 2>&1 &
После запуска Corsa запустите демон PirateCash. - Запустите кошелек: ./piratecashd
-
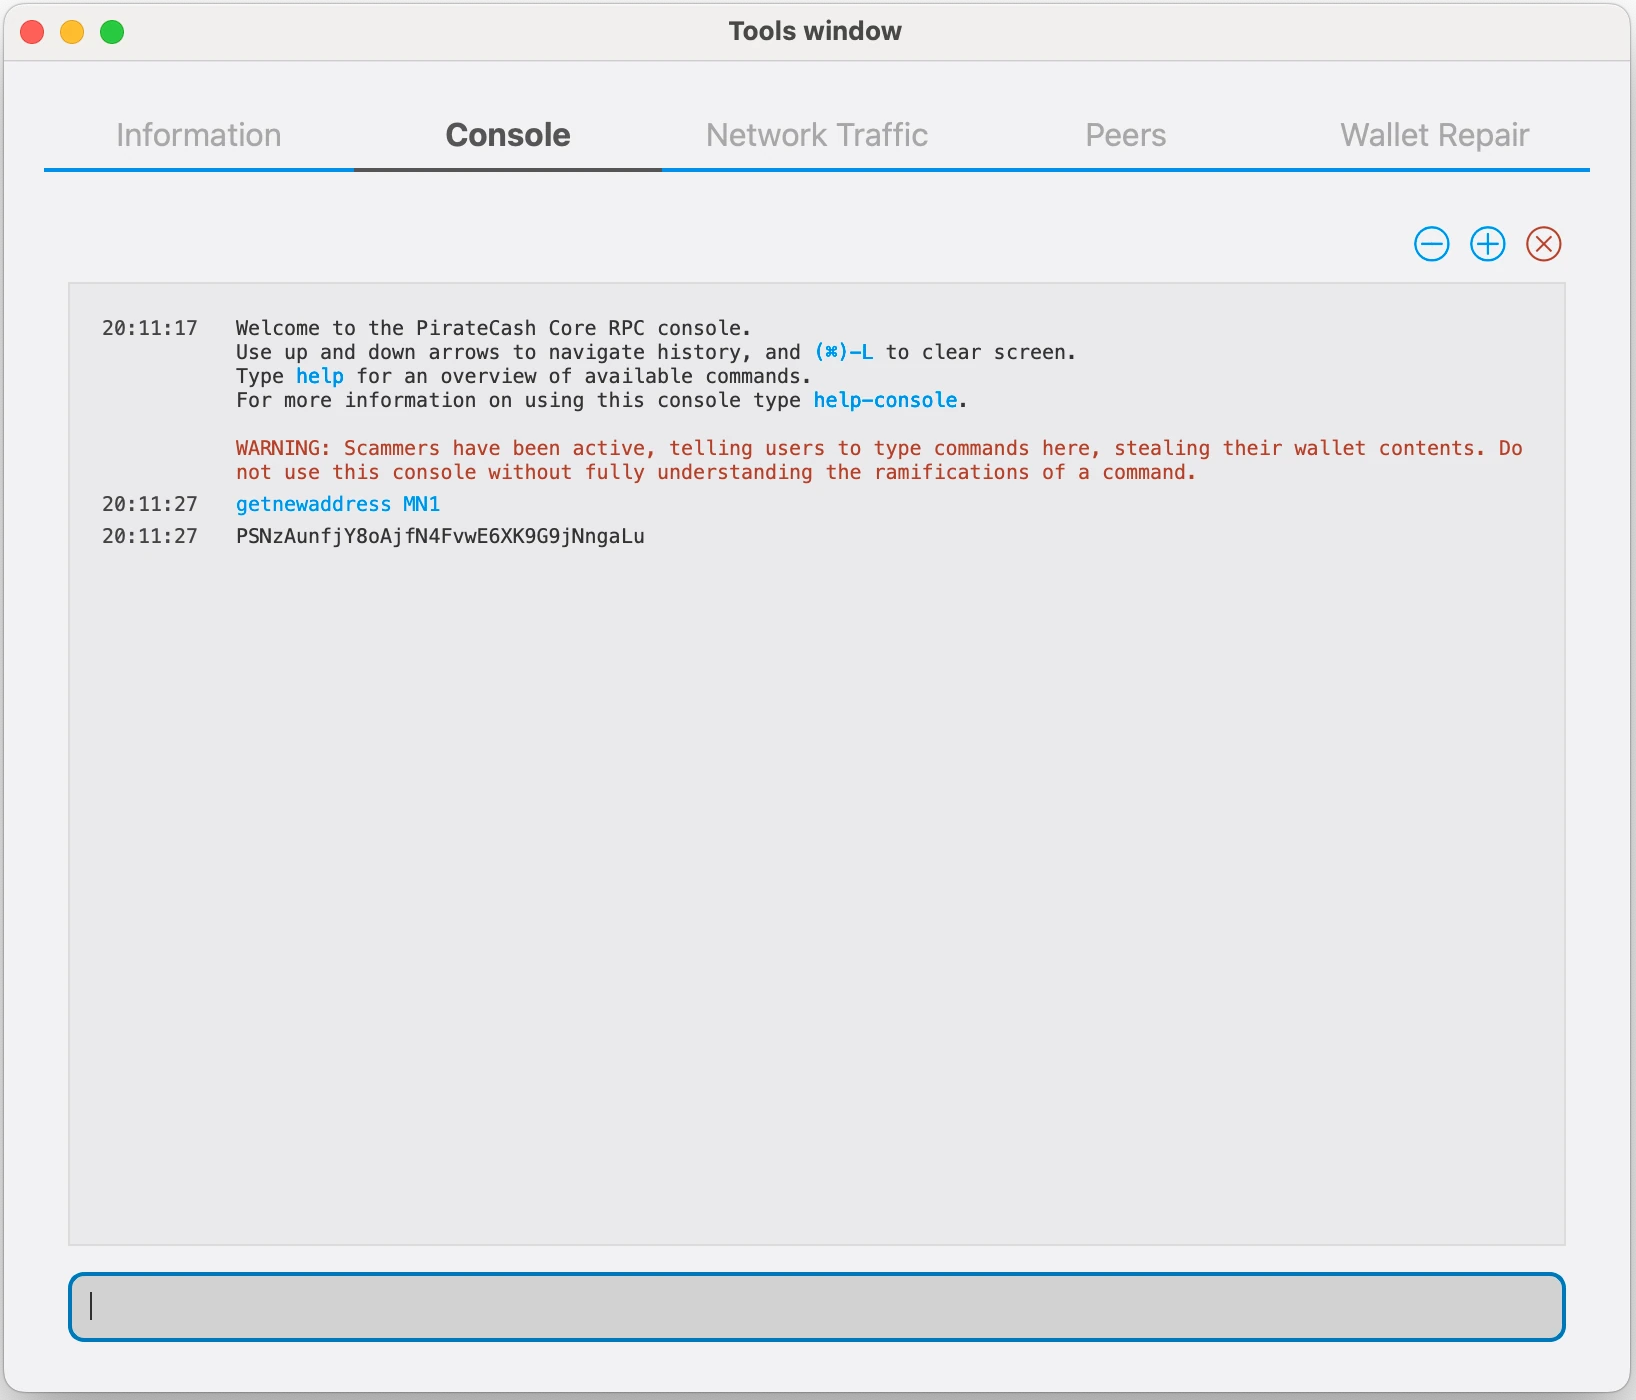
Нажмите Window -> Console, чтобы открыть консоль. Введите следующую команду для генерации нового адреса PirateCash под залог:
getnewaddress MN1
-
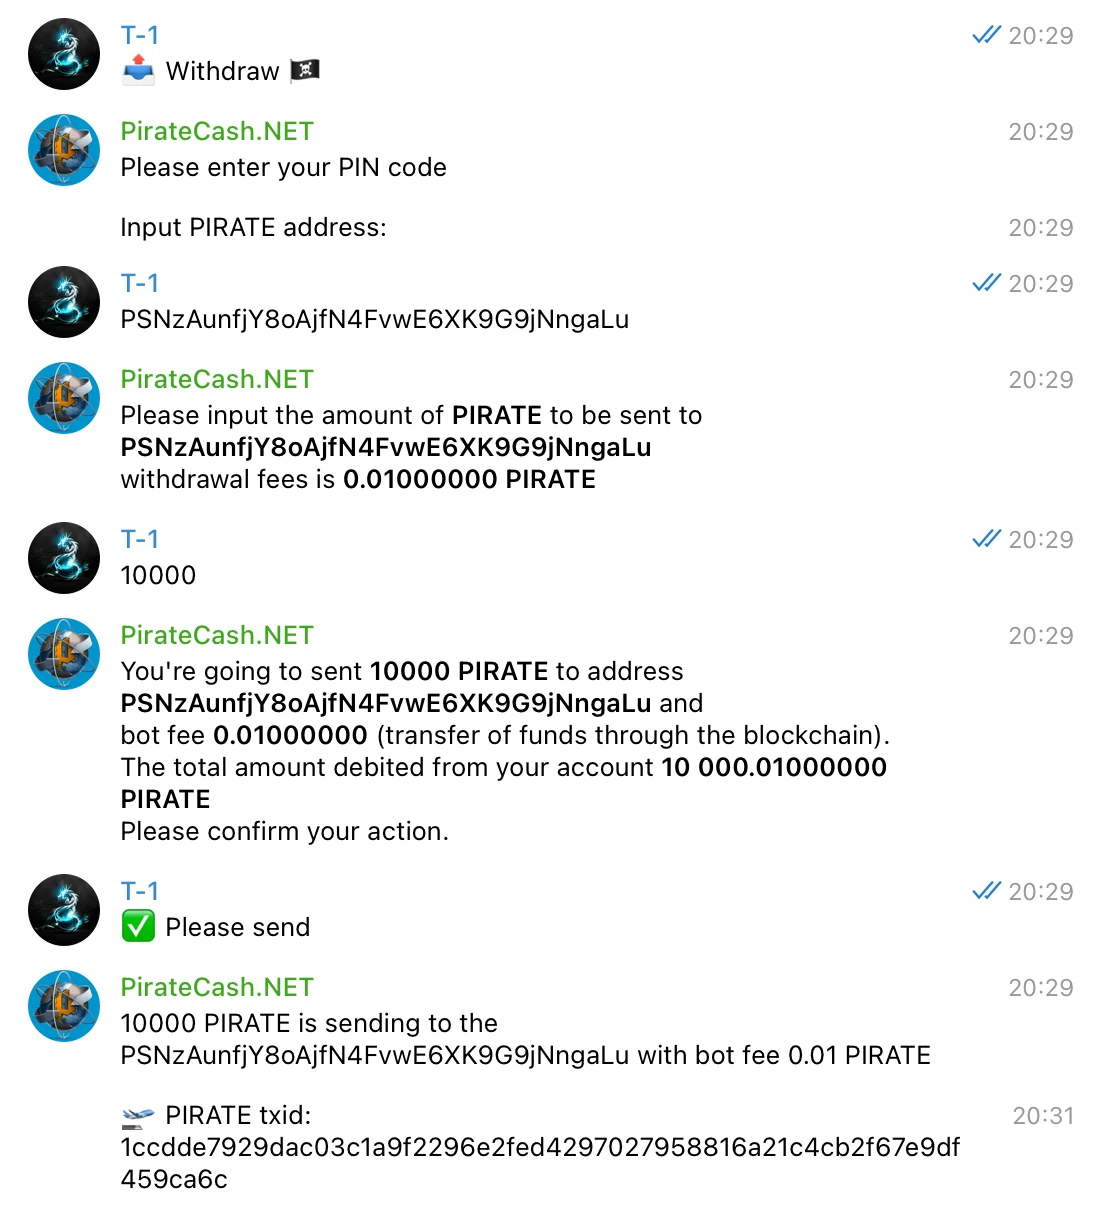
Чтобы отправить 10,000 PIRATE на этот адрес через @piratecash_bot, перейдите в меню 💵 Баланс → PirateCash → 📤 Вывод или выполните команду /withdraw_pirate.
-
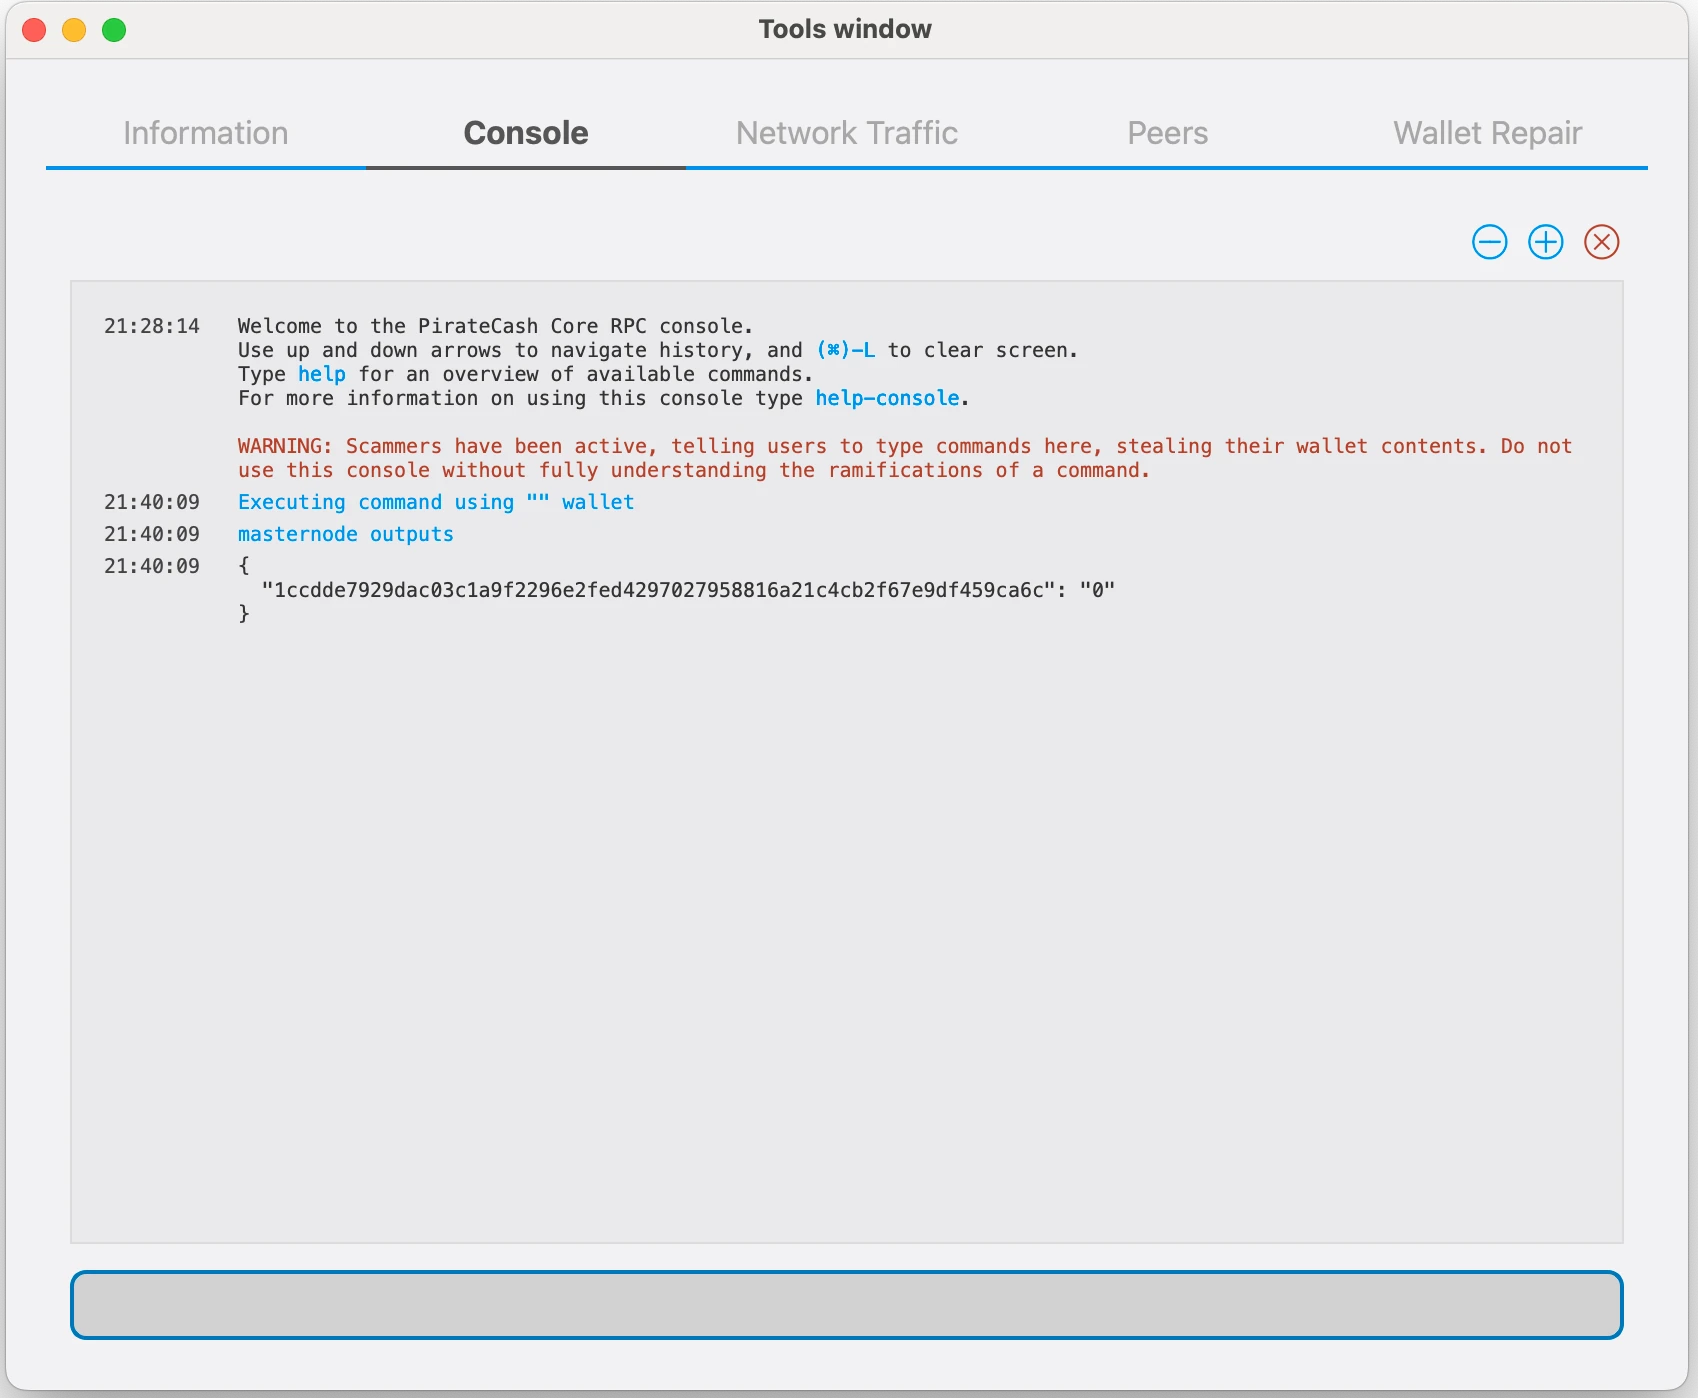
После завершения транзакции нужно извлечь различные ключи, связанные с ней, для последующего добавления в конфигурационный файл и регистрационную транзакцию. Эта регистрационная транзакция служит доказательством, записывает конфигурацию в блокчейн и обеспечивает включение мастерноды в детерминированный список. Выполните masternode outputs
-
Подготовьте транзакцию ProRegTx
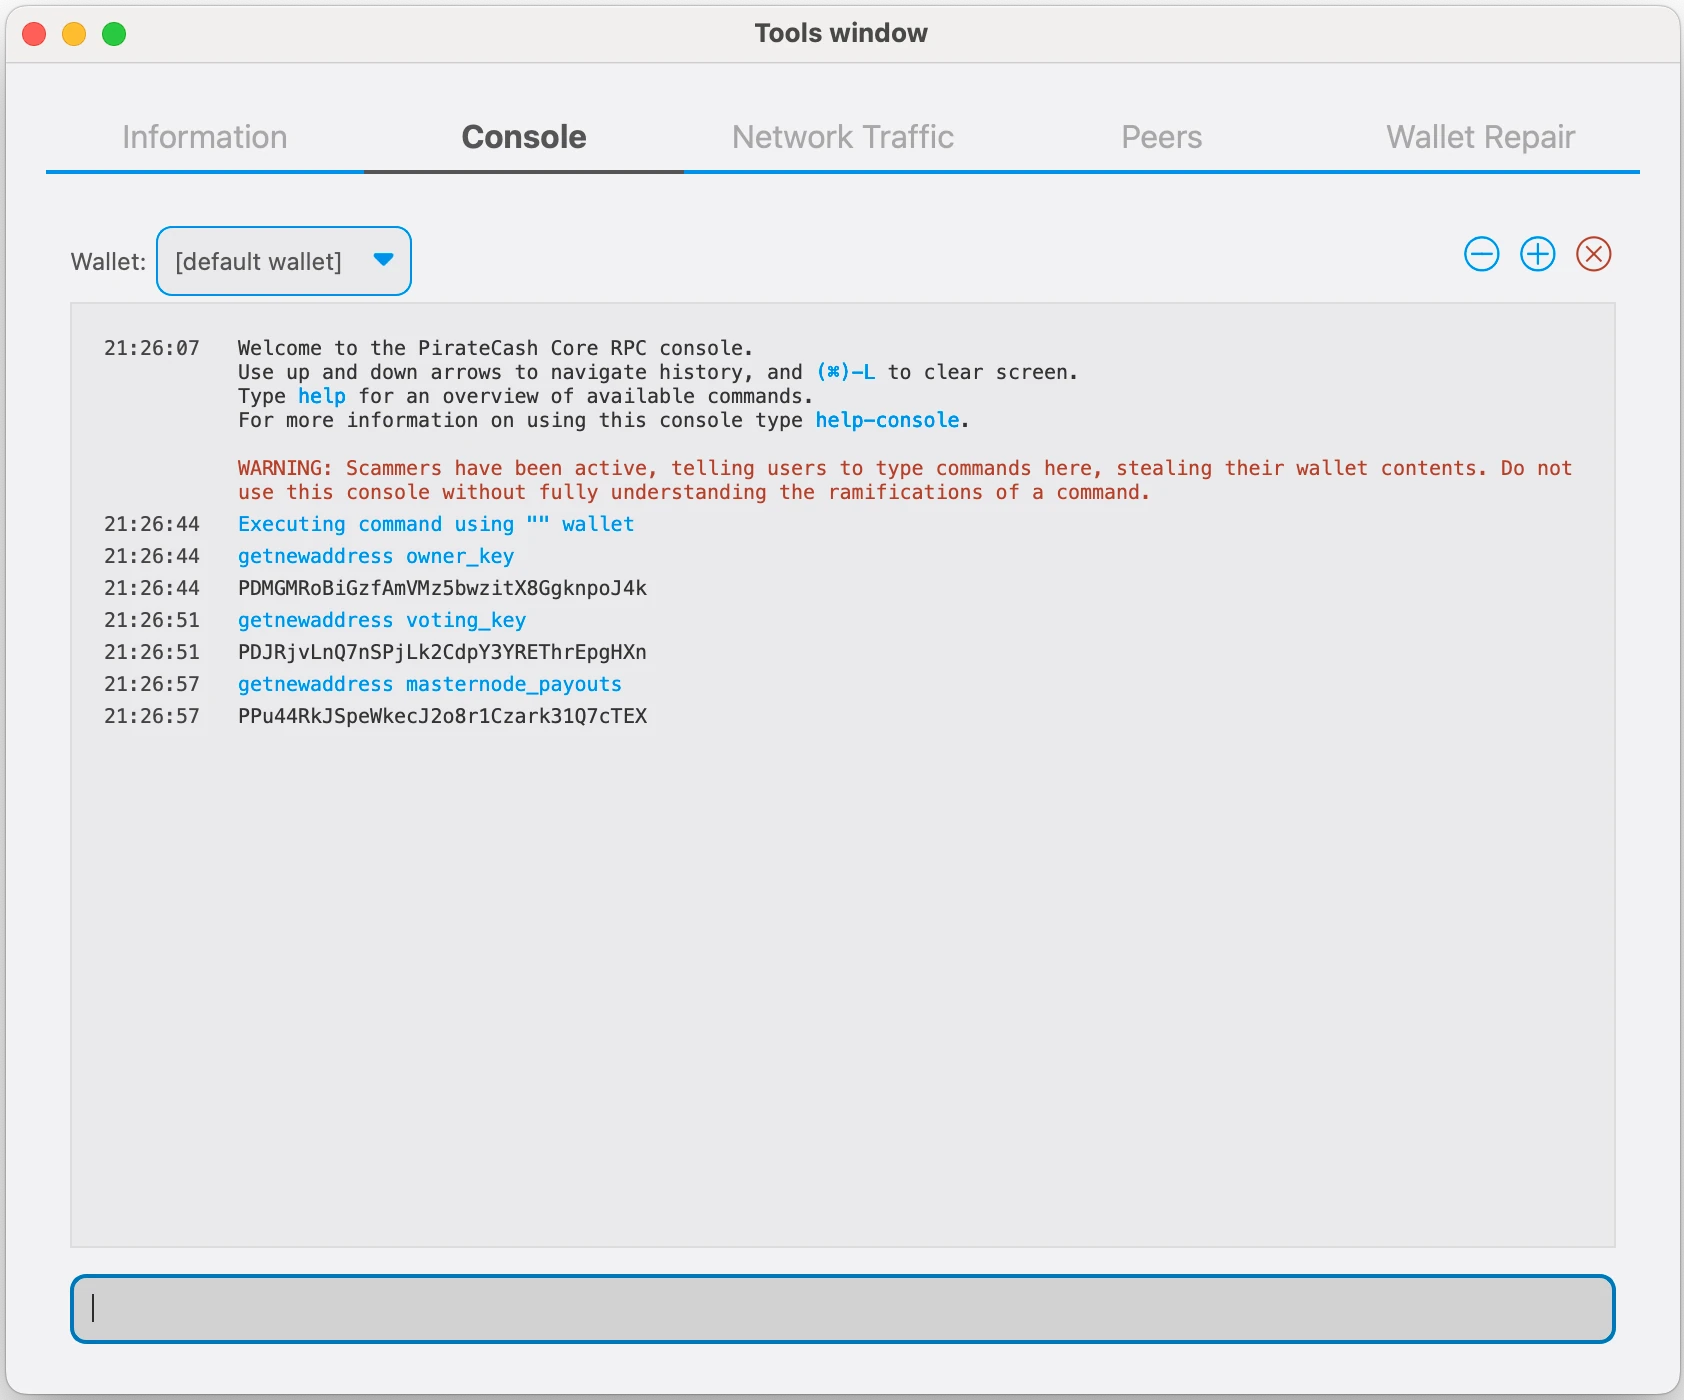
Сначала нужно получить новый неиспользованный адрес из кошелька, который будет адресом ключа владельца (ownerKeyAddr). Это не тот же адрес, на котором находится залог 10,000 PIRATE. Создайте новый адрес командой:
getnewaddress owner_key
-
Этот адрес также можно использовать как адрес ключа голосования (votingKeyAddr). Либо можно указать адрес, предоставленный выбранным делегатом для голосования, или просто создать новый адрес ключа голосования командой:
getnewaddress voting_key
-
Затем создайте или выберите существующий адрес для получения выплат владельца мастерноды (payoutAddress). Также можно использовать адрес вне кошелька:
getnewaddress masternode_payouts
-
Также нужно создать и пополнить еще один адрес как источник комиссии транзакции (feeSourceAddress). Если выбран внешний адрес выплат, необходимо указать адрес источника комиссии:
getnewaddress pay_fees
-
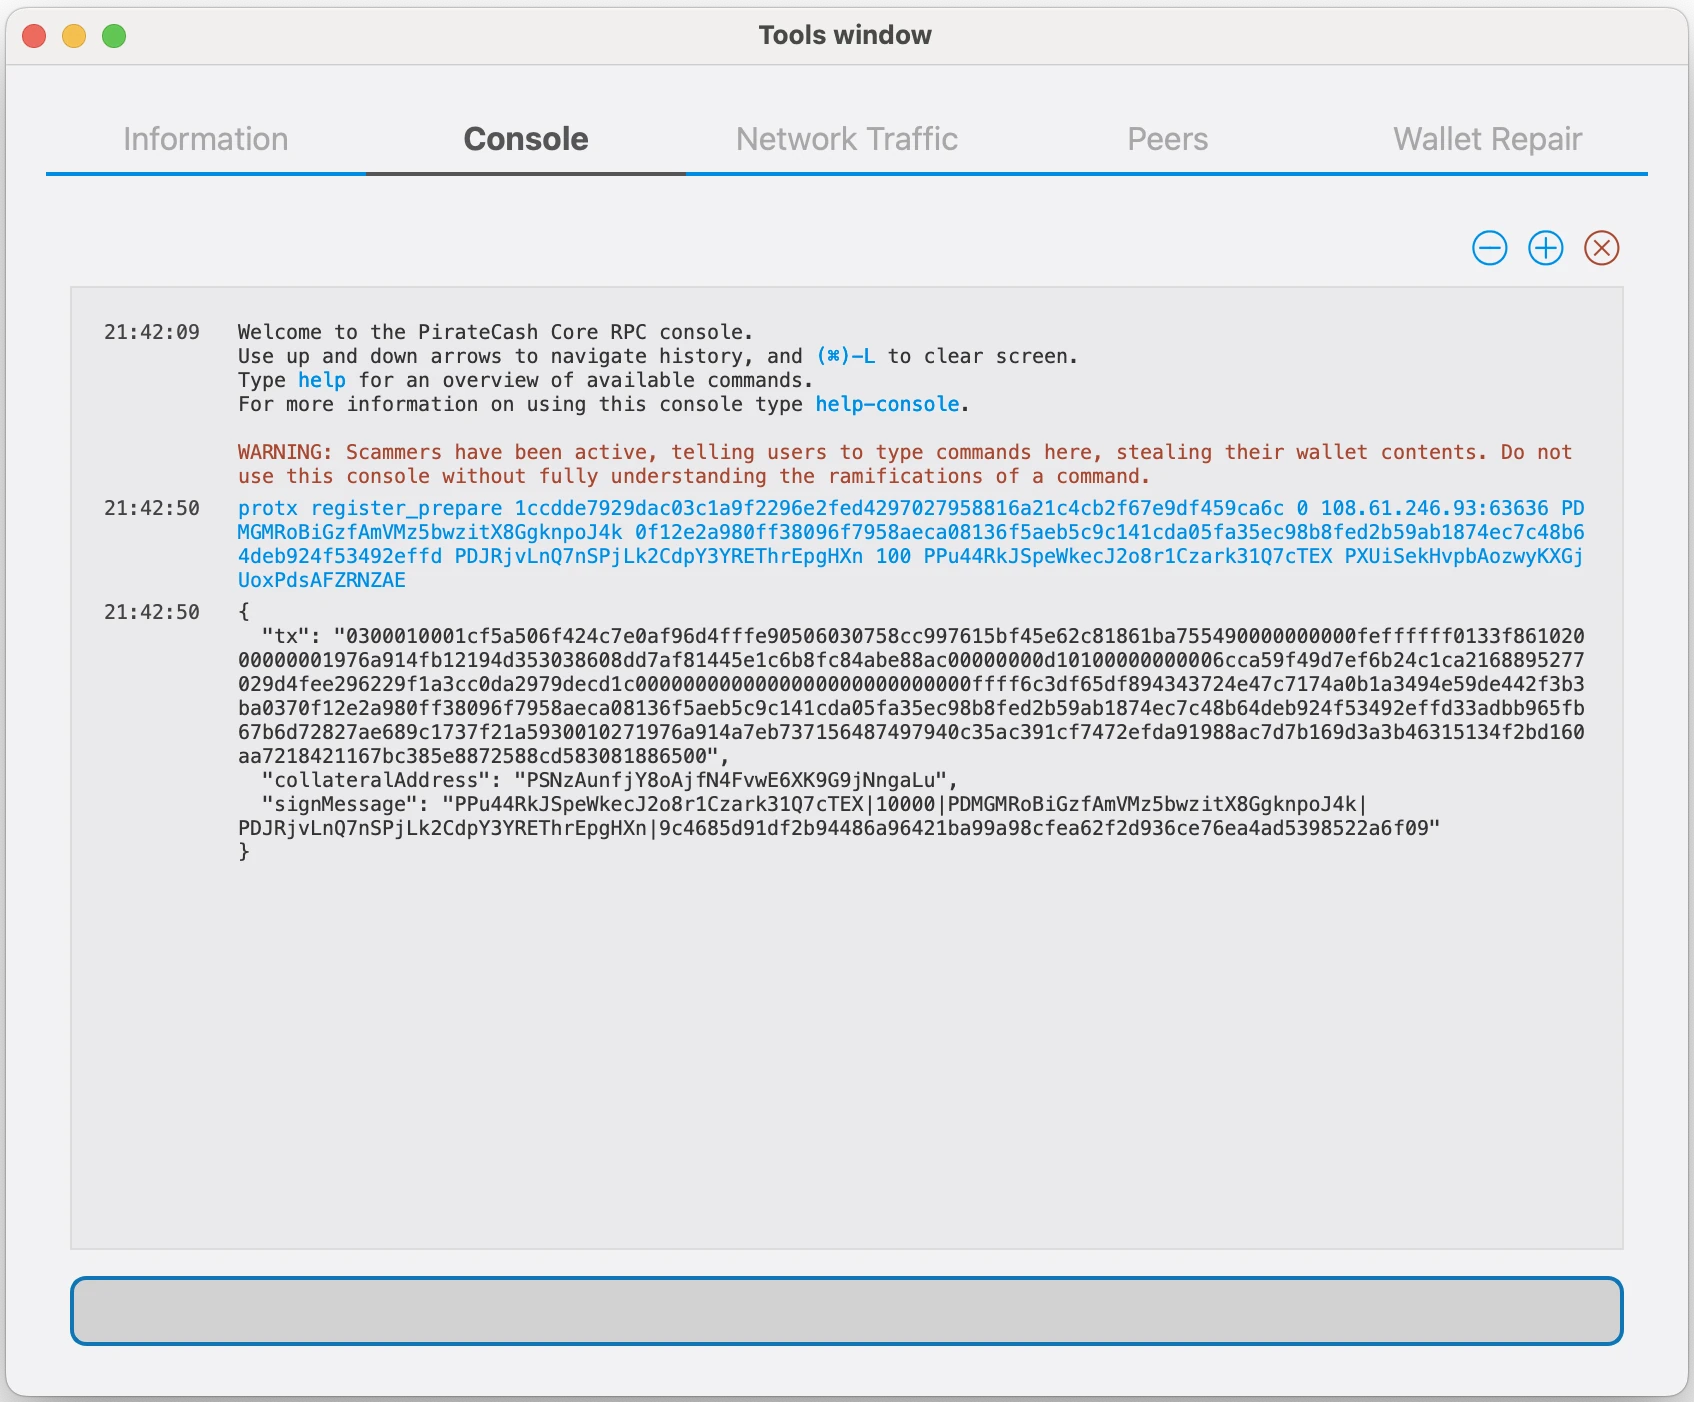
Теперь подготовим неподписанную специальную транзакцию ProRegTx с помощью команды protx register_prepare. Синтаксис команды:
protx register_prepare collateralHash collateralIndex ipAndPort ownerKeyAddr operatorPubKey votingKeyAddr operatorReward payoutAddress feeSourceAddress
Откройте текстовый редактор, например notepad, чтобы подготовить эту команду. Замените каждый аргумент следующим образом:
collateralHash: txid транзакции залога на 10,000 PIRATE
collateralIndex: индекс выхода транзакции залога на 10,000 PIRATE
ipAndPort: IP-адрес и порт мастерноды в формате x.x.x.x:63636
ownerKeyAddr: новый адрес PirateCash, созданный выше для адреса владельца/голосования
operatorPubKey: публичный BLS-ключ, созданный выше или предоставленный вашим хостинг-сервисом
votingKeyAddr: новый адрес PirateCash, созданный выше, или адрес делегата для голосования
operatorReward: процент награды за блок, выделяемый оператору в качестве оплаты
payoutAddress: новый или существующий адрес PirateCash для получения наград владельца мастерноды
feeSourceAddress: адрес для оплаты комиссии ProTx. Если он не указан, будет использован payoutAddress.
-
Подпишите транзакцию ProRegTx
Теперь подпишем содержимое поля signMessage приватным ключом адреса залога, указанного в collateralAddress. Для этого шага не требуется подключение к интернету, поэтому кошелек может оставаться отключенным от сети в холодном хранении. В этом примере снова используется PirateCash Core, но также можно использовать функцию подписи аппаратного кошелька. Синтаксис команды:
signmessage collateralAddress signMessage

-
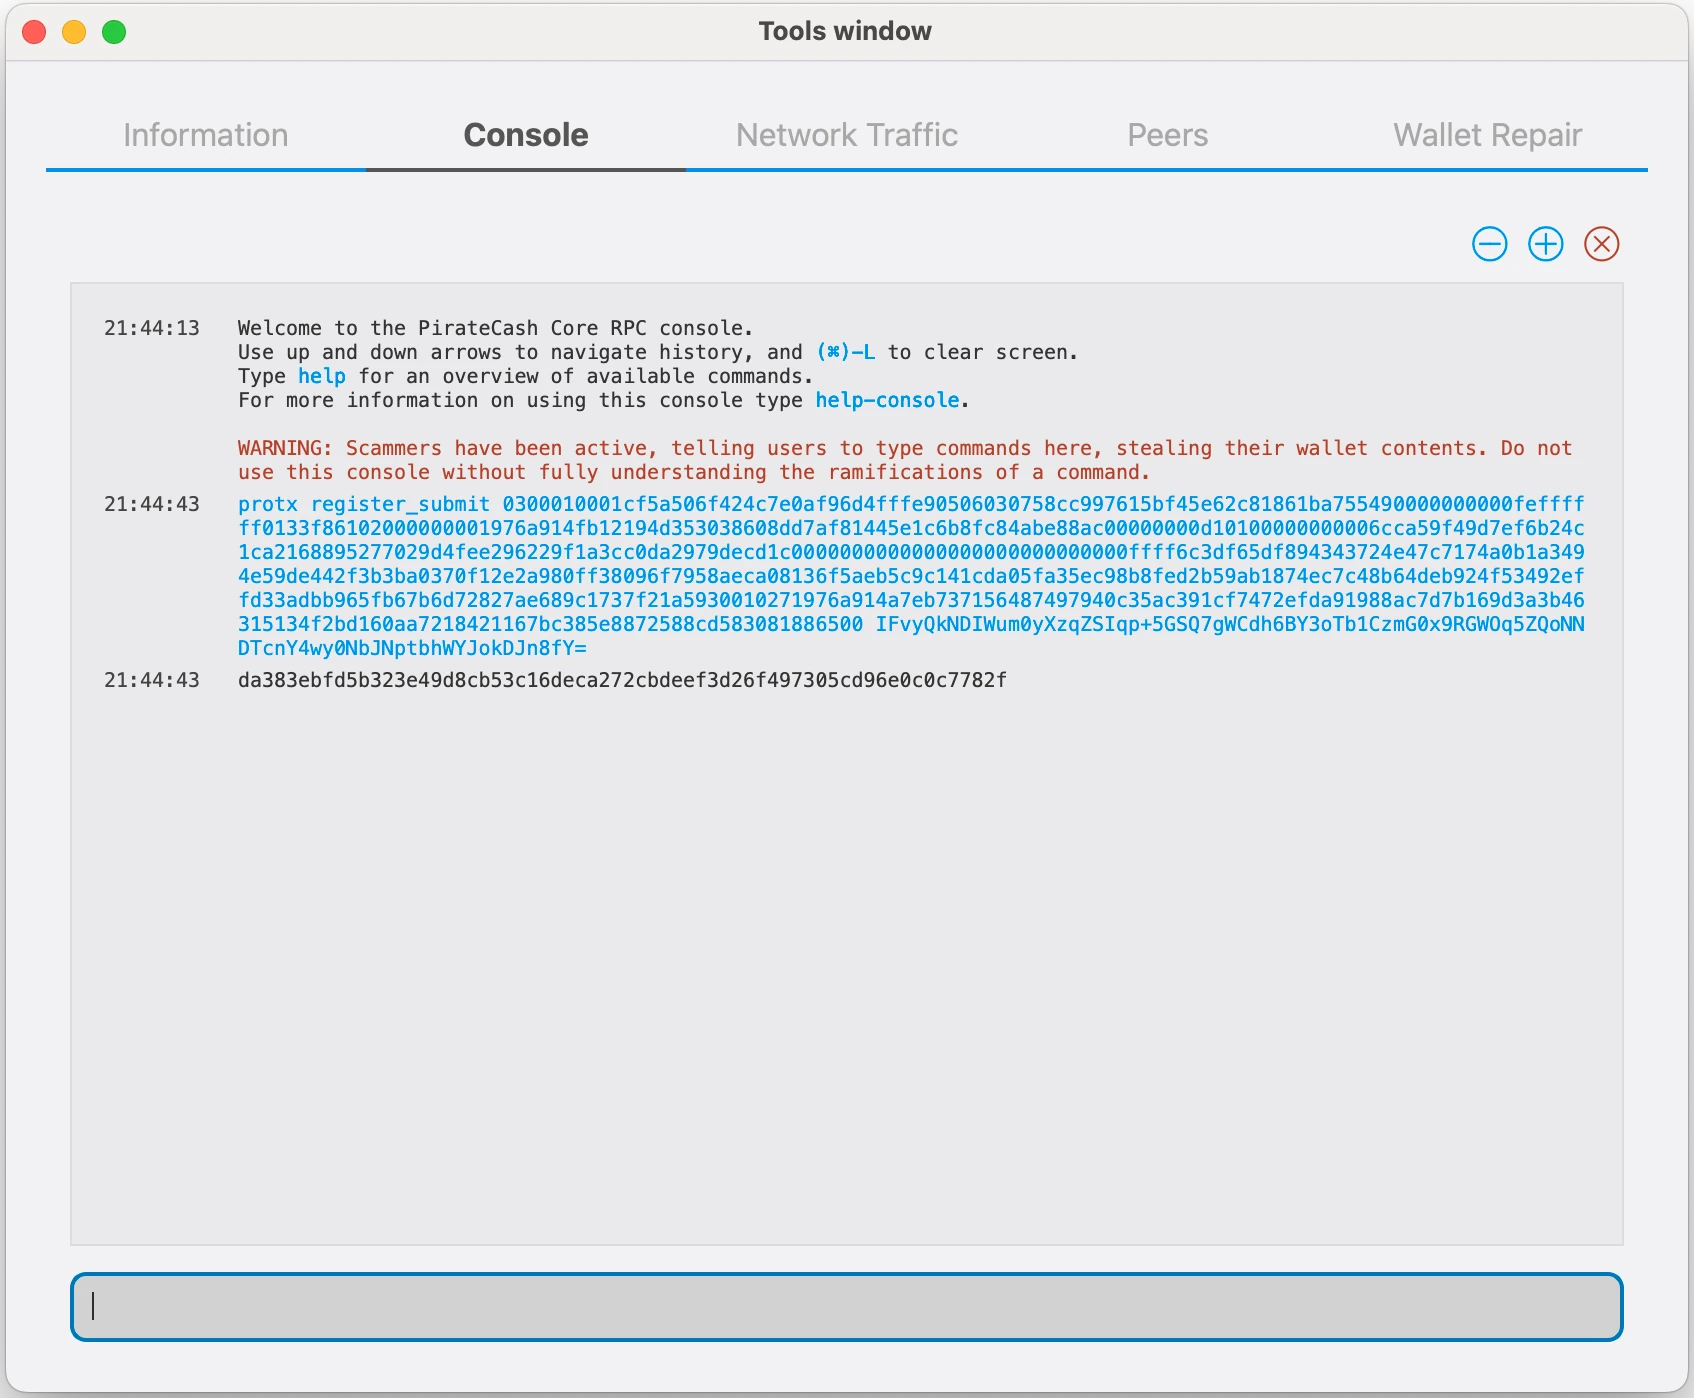
Отправьте подписанное сообщение
Теперь отправим специальную транзакцию ProRegTx в блокчейн для регистрации мастерноды. Эту команду нужно выполнить из кошелька PirateCash Core, на котором есть баланс на feeSourceAddress или payoutAddress, так как потребуется стандартная комиссия транзакции. Синтаксис команды:
protx register_submit tx sig
tx: сериализованная транзакция, ранее полученная в поле tx после команды protx register_prepare
sig: сообщение, подписанное ключом залога через команду signmessage
-
Ваша мастернода зарегистрирована и появится в детерминированном списке мастернод после включения транзакции в блок.
Требование corsa-chat
Требование corsa-chat для PirateCash Core v19
Начиная с PirateCash Core v19, мастернода должна также запускать локальную ноду corsa-chat/Corsa на том же сервере. Автоматическая настройка из репозитория masternode настраивает PirateCash Core и corsa-chat вместе. Требование описано в PIP-0001.
PirateCash Sentinel
Настройка Sentinel больше не нужна для новых мастернод. Поддержка Sentinel будет deprecated в PirateCash Core v20, поэтому Sentinel и cron-задачу Sentinel устанавливать не нужно.